How To Plant Water Lilies
TIP: If you have just received a bare root water lily, float it in non-chlorinated water until it is planted.
There are many ways to plant water lilies but we have achieved the most success with the following materials and methods.
Assemble Materials
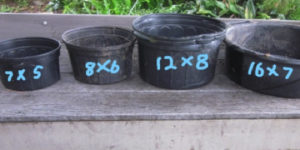
Water Lily Pots
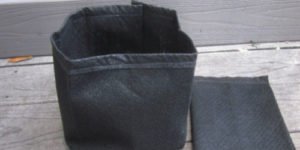
Water Lily “GroBag”
- Containers, either pots or bags. If you choose a pot, use one without holes, or with holes plugged. A decorative pot may be used for container type plantings. Bigger pots will yield a larger plant and flowers. At Wonderful Water Lilies we use 3 gallon squat pots (12″ wide and 8″ deep) for medium and large varieties. Small plants may be planted in smaller pots. Another option is a GroBag which is available in our online store. GroBags are porous and allow the exchange of gasses for good root development. They drain quickly when lifted out of the pond and are almost impossible to tip over if there is a raccoon invasion.
- Top soil. Not potting soil, which will float out of the pot. Available at nurseries or maybe your own back yard.
- Fertilizer. We like slow release fertilizer with a 14-4-14 ratio and an advertised total release time of over 6 months. The rate of release for slow release fertilizer depends on moisture and heat, so in our hot Florida climate it may only last 5 months. Nonetheless, the amount and timing should follow the manufacturer’s recommendations.
- Composted cow manure.
- Bone meal.
- Non-chlorinated water.
- River rock or small pebbles.
Planting a Water Lily – Step By Step
- Put one inch of top soil into the bottom of the pot.
- Sprinkle slow release fertilizer over the soil using about 4 tablespoons per 3 gallon pot. Putting the fertilizer deep into the pot reduces the fertilizer available for algae growth.
- Continue filling the pot with top soil to the 2/3 level.
- Add enough water to thoroughly moisten the soil. We like to do this the day before or several hours before planting. You are ready for the next step when a handful of dirt makes a clump when squeezed. Too much water makes a soupy mix that will float out of the pot when submersed. If the soil is too wet mix in some dry soil until you reach the right consistency. Compress the soil to get as much air out of the soil as possible.
- Put a layer of composted cow manure on top of the soil. The amount depends on the size of the plant. To gauge how much that might be, familiarize yourself with the remaining steps first, and then come back to this step. When finished, you will want the final level of soil surrounding the crown of the plant to be about one inch below the top of the pot.
- Mix one tablespoon of bone meal into the cow manure then form a hill in the center of the pot for the plant. Compress the cow manure hill.
- Place the water lily on the hill and distribute the roots around the hill.
- Cover the hill and the roots with more damp soil and compress again. DO NOT COVER THE WATER LILY CROWN. It should peek out of the dirt.
- Cover with pebbles to hold the soil in the pot. Do not put stones over the crown.
- Lower the pot into the pond. We like to lean the pot against the edge of the pond so air bubbles escape along the side of the pot and not in the middle where the plant could be forced out of the dirt. Once the air bubbles stop escaping place the pot flat in the pond. If the water is too deep and the flowers are submerged put bricks, cement blocks, or black plastic milk crates under the pot so the top of the pot is about 3 inches below the water level.
How To Repot A Water Lily
If you cannot stick your finger into the dirt it is time to repot. The roots have filled the pot and there is no more room to grow.
Dump out the pot and wash the dirt off the roots using a garden hose. Cut the roots off leaving about 6 inches. Remove all but 6 leaves. All of this pruning will invigorate the plant. Proceed to plant as outlined above.
Fertilizing A Mature Water Lily
Follow the fertilizer manufacturer’s direction for frequency and amount. Slow release fertilizers release nitrogen, phosphorous, and potassium and minor elements based on moisture and temperature so you may need to fertilize slightly more often in hot climates. When there are fewer flowers and the leaves are smaller than usual it is time to fertilize.
If you are using fertilizer stakes or tabs push them into the soil about half way between the edge of the pot and the plant. Push them as far down as you can and push the dirt together again. If you are using slow release granular fertilizer it is best to lift the pot out of the water and make four holes distributed around the pot half way between the edge of the pot and the plant and as deep as possible. Add 1 tablespoon of fertilizer in each hole and close the hole again by squeezing the dirt together.